We are going to go through the process of clearing cache on Chrome. Cache is like a storage area for the files that a web page downloads. If the page is visited multiple times, instead of downloading everything again, the web browser will bring the page up from the cache. This saves bandwidth and makes things faster but it can cause problems if you are making changes to your website and want to see the results because the browser will bring up the old data.
Luckily, there is an easy fix for this and it is called clearing the cache. There are two ways that I know of to get to the place where you can clear the cache.
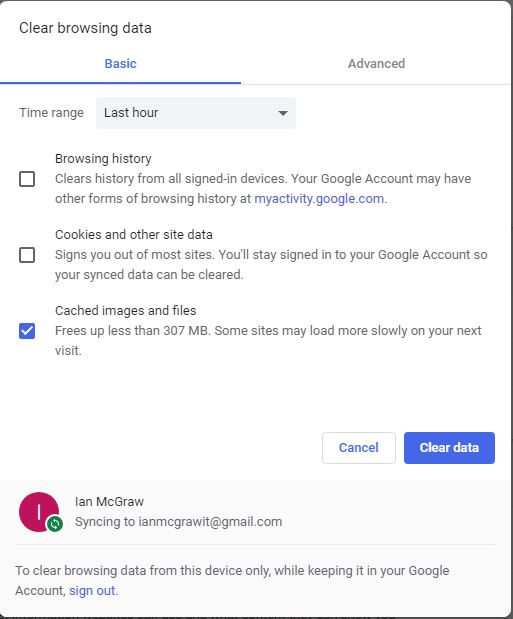
1. Push Ctrl+Shift+Delete on your keyboard (if you have a Mac, it’s Cmd+Shift+Delete). This brings up the Clear Browsing Data window.

At this point you are given a number of options. The only one we are interested in right now is Cached images and files. Click on the checkbox next to Cached images and files and leave the others unchecked. Now click on Clear data. This will delete the cached files and if you refresh your screen, you should now see the changes that you made to your website.
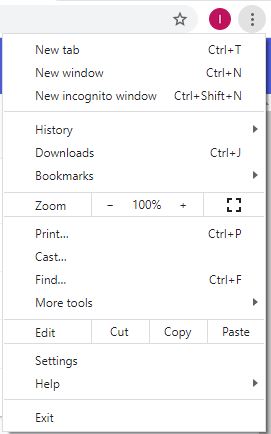
2. Click the 3 vertical dots in the upper right of your screen. This will bring down a menu.

Click on More tools. This brings out a submenu.

Now click on Clear browsing data. This brings up the same screen that pushing Ctrl+Shift+Delete did. 
At this point you are given a number of options. The only one we are interested in right now is Cached images and files. Click on the checkbox next to Cached images and files and leave the others unchecked. Now click on Clear data. This will delete the cached files and if you refresh your screen, you should now see the changes that you made to your website.